
WordPress is one of the popular Content Management System often known as CMS. Bluehost WordPress Hosting is yet another popular phenomenon that occurs on the internet for this CMS management.
When you plan to install your site using WordPress, and you are doing so for the first time, it is natural that you will be a little bit perplexed and non-confident. But don’t worry, after reading this article, WordPress installation is going to be a breeze for you and you will, in fact, enjoy it doing so.
The whole process of ‘Bluehost WordPress Hosting’ is not going to take more than 10 minutes. But then, there is one precondition that you must follow each and every deliberated step sincerely and with great patience.
Things Required for a Bluehost WordPress Hosting
Before you begin installing WordPress on Bluehost, and carry out your task of Bluehost WordPress Hosting, you must ensure that following things and the details are readily available with you.
- Domain Name – You can buy a domain name from any of the company of your choice, but since you are going to use Bluehost WordPress Hosting, it is always recommended to purchase the domain from Bluehost itself.
- Hosting Plan – Blue host provides different types of hosting plans for hosting your site. They differ from one another in terms of its technical details, facilities, country etc. There are basically three types of hosting available for the clients. They are Server based hosting (namely VPS or Dedicated Server), Shared hosting and Cloud hosting (DevCloud or CloudSites). In this article, we are talking about ClouSites hosting but overall procedure is more or less similar for other types of hosting also.
- cPanel Logging Details – You must have cPanel Logging URL or IP address with passwords. This is provided by Bluehost through E-mail when you purchase the hosting plan from them.
- DNS Adress – This is again provided by the hosting partner which in our case is Bluehost.
Recommended for You:
How To Migrate From Blogger To WordPress
How To Manage Multiple WordPress Sites And Setup
Let Us Start
Armed with above details, let us start installing WordPress onto our domain. WordPress can be installed in two ways from cPanel. The Automatic Mode and the Manul Mode. Here we are going to follow the automatic mode because that is the easiest and most convenient way of installation. Also, there are no chances of any mistakes during the Bluehost WordPress Hosting procedure.
So let us do it. Now sit down before your computer, open your browser. Chrome is always good for such task. Use cPanel login URL and the password and login to open the cPanel. Here onwards, you can follow the below-mentioned steps to install WordPress.

WordPress Installation
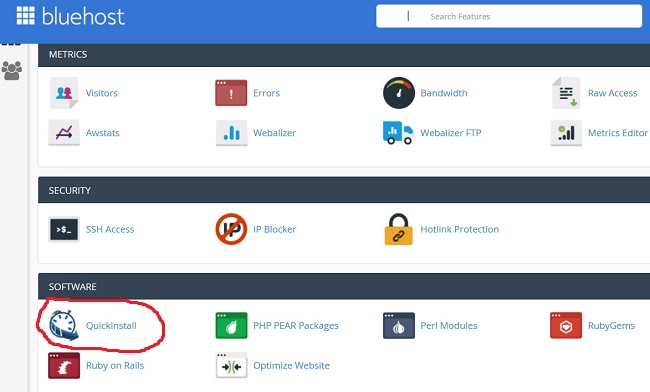
1. Go to Cloudsites cPanel
2. Go to Software > Quickinstall
3. Double click Quickinstall
4. Select WordPress and under Install WordPress For FREE, click on Install WordPress.
5. You must now fill up WordPress details as below.
- Select your domain name.
- Select Installation Path. If you don’t provide any specific path, WordPress will be installed under the root directory. It is better to install under root directory only.
- Provide Admin Email, User detail, and Blog Title Name.
6. Click on Install WordPress.
7. Your WordPress will be installed. That’s All.
8. Look for the login details created by WordPress to login in to Admin panel which will look like as follows.URL: http://example.com/wp-admin
User ID: xxXXXxXXxxx
PS: XXxxxXxxXXxxXX9. Now you can log in to your WordPress admin panel by using above details and install required theme, plugins and carry out further configurations.
10. Don’t keep the default permalink for your site. Try to configure a custom permalink for your site. A SEO optimized permalink is always better and it depends upon the type of the website. So do a little bit of research work and select the best permalink for you.
After completing the above task, you should login to you Bluehost account and click on the domain name to go to control panel. There you should find the Name Server and enter the server details, which was provided to you as follows:-
cns1.bluehost.in
cns2.bluehost.in
With this, installation of the Bluehost WordPress Hosting is completed. Your Admin Control Panel will look like something as above. So go over browsing the different controls and buttons to explore more about WordPress.
All the Best.
[…] 5. Now go to the new host site and install WordPress. You can take help of article how to install WordPress. […]